


Stop the Drip: A Comprehensive Guide to Trolley Jack Seal Replacement and Preventing Dangerous Hydraulic Leaks
Your trusty trolley jack is a workshop essential. But when it starts leaking hydraulic fluid, it’s not just a messy inconvenience; it’s a serious safety hazard. A leaking jack can fail under load, leading to dropped vehicles, potential injury, and costly damage. This guide provides a comprehensive, SEO-optimized approach to understanding and replacing trolley jack seals, helping you maintain a safe and functional piece of equipment.
Understanding the Importance of Replacing Trolley Jack Seals
Hydraulic jacks rely on a closed system of hydraulic fluid and seals to generate the immense lifting power they provide. These seals, typically made of rubber or polyurethane, are designed to contain the fluid under pressure. Over time, however, these seals can degrade due to:
- Age and Wear: Rubber deteriorates with age, heat, and exposure to hydraulic fluid.
- Contamination: Dirt, grit, and other contaminants can abrade and damage the seals.
- Improper Storage: Leaving a jack fully extended for extended periods can stress the seals.
- Overloading: Exceeding the jack’s rated capacity puts undue pressure on the seals.
When seals fail, hydraulic fluid leaks out, reducing lifting capacity and eventually leading to complete failure. Replacing these seals is crucial for:
- Safety: Preventing accidents and injuries.
- Functionality: Restoring the jack’s lifting capabilities.
- Longevity: Extending the lifespan of your jack.
- Preventing Further Damage: Addressing leaks before they cause more significant internal problems.
Identifying the Symptoms of a Leaking Trolley Jack
Before you dive into seal replacement, it’s essential to diagnose the problem accurately. Here are the telltale signs of a leaking trolley jack:
- Visible Fluid Leaks: Look for puddles of hydraulic fluid under the jack, particularly around the ram, pump, and base.
- Reduced Lifting Capacity: The jack may struggle to lift the intended load or lift it more slowly than usual.
- Sinking Under Load: The jack slowly lowers even when supporting a vehicle.
- Spongy or Unresponsive Pumping Action: Difficulty pumping the handle, or a feeling of “give” when pumping.
- Air in the System: This can cause a jerky lifting motion or difficulty bleeding the system.
Step-by-Step Guide to Replacing Trolley Jack Seals
Safety First! Before you start, ensure the following:
- Safety Glasses: Protect your eyes from splashing fluid.
- Gloves: Protect your skin from hydraulic fluid.
- Proper Ventilation: Work in a well-ventilated area.
- Vehicle Support: Never work under a vehicle supported only by a jack. Always use jack stands.
- Clean Workspace: A clean workspace minimizes the risk of contamination.
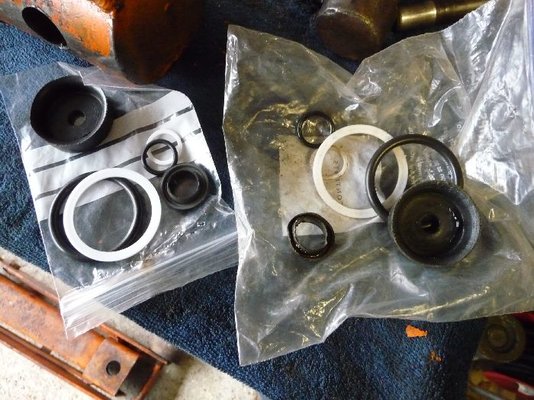
Tools and Materials You’ll Need:
- Replacement Seal Kit: Specific to your jack’s make and model. (This is CRUCIAL - research your jack model!)
- Hydraulic Fluid: Compatible with your jack (check your jack’s manual).
- Wrenches/Sockets: Appropriate for disassembling the jack.
- Pliers: For removing and installing certain components.
- Small Screwdriver or Pick: For removing old seals.
- Clean Rags or Shop Towels: For cleaning components.
- Parts Cleaner: To remove old grease and grime.
- Bench Vise (Optional but helpful): For holding parts securely.
- Assembly Grease (Optional): For lubricating seals during installation.
- Hammer (Optional): For gently tapping components.
Step-by-Step Instructions:
- Drain the Hydraulic Fluid:
- Lower the jack completely.
- Locate the fill plug (usually a small screw).
- Carefully remove the fill plug and allow the fluid to drain into a suitable container. Dispose of the fluid responsibly.
- Disassemble the Jack:
- Consult your jack’s manual for specific disassembly instructions. Each jack model is slightly different.
- Remove any covers, linkages, and brackets that obstruct access to the hydraulic components.
- Take photos at each stage to help with reassembly.
- Use wrenches or sockets to loosen and remove bolts and fasteners.
- Identify and Remove the Old Seals:
- Carefully inspect all the seals in the hydraulic components (ram, pump, release valve).
- Use a small screwdriver or pick to gently pry out the old seals. Be careful not to scratch the metal surfaces.
- Note the orientation of each seal for proper reassembly.
- Clean the Components:
- Thoroughly clean all the hydraulic components with parts cleaner.
- Remove all traces of old hydraulic fluid, grease, and debris.
- Inspect the surfaces for any damage or wear.
- Install the New Seals:
- Lubricate the new seals with hydraulic fluid or assembly grease (if recommended).
- Carefully install the new seals in the same orientation as the old ones.
- Ensure the seals are properly seated and not twisted or pinched.
- Reassemble the Jack:
- Carefully reassemble the jack, following the disassembly steps in reverse.
- Tighten all bolts and fasteners to the manufacturer’s specifications (if available).
- Fill with Hydraulic Fluid:
- Replace the fill plug.
- Slowly fill the jack with the correct type and amount of hydraulic fluid (refer to your jack’s manual).
- Bleed the System:
- Open the release valve (usually by turning the handle).
- Pump the jack handle several times to remove any air from the system.
- Close the release valve.
- Test the Jack:
- Carefully lift a load (start with a light load) and observe the jack’s performance.
- Check for any leaks or unusual noises.
- If the jack operates correctly, it’s ready for use.
Important Considerations for Success:
- Research Your Jack Model: The most critical step! Find the correct seal kit specific to your jack.
- Take Your Time: Rushing the process can lead to mistakes and further damage.
- Cleanliness is Key: Contamination is the enemy of hydraulic systems.
- Refer to Your Jack’s Manual: It provides specific instructions for your model.
- Consider Professional Help: If you are uncomfortable with any part of the process, consult a qualified mechanic.
Conclusion: Protecting Your Safety and Equipment
Replacing trolley jack seals is a vital maintenance task that safeguards your safety and protects your investment. By understanding the causes of leaks, recognizing the symptoms, and following this step-by-step guide, you can confidently address hydraulic issues and keep your jack operating safely and efficiently. Remember to always prioritize safety, use the correct tools and materials, and consult your jack’s manual for specific instructions. Regularly maintaining your trolley jack will ensure its longevity and allow you to work on vehicles with confidence for years to come.
Frequently Asked Questions (FAQs):
- How often should I replace my trolley jack seals? Seal life varies depending on usage, storage, and environmental conditions. It’s best to inspect your jack regularly (every 6-12 months) for signs of leaks. Proactive replacement, even before leaks are detected, is a good preventative measure, especially with heavy use.
- Can I use any type of hydraulic fluid in my trolley jack? No. Using the wrong type of hydraulic fluid can damage the seals and internal components. Refer to your jack’s manual for the recommended type of fluid. Using the wrong fluid can render your warranty void.
- What if I can’t find a seal kit for my trolley jack? If you can’t find a specific seal kit, you may be able to source individual seals from a hydraulic parts supplier. However, it’s generally easier and more cost-effective to purchase a complete kit. Consider replacing the entire jack if seal parts are unavailable, or the jack is beyond repair.
- My jack leaks slowly, do I need to replace the seals immediately? While a slow leak may seem minor, it indicates a compromised seal. Address the leak promptly. Continued use can lead to complete failure and a dangerous situation.
- Can I reuse the hydraulic fluid after draining it? It’s generally not recommended. Hydraulic fluid can become contaminated with debris and may lose its effectiveness over time. Always use fresh, clean hydraulic fluid when refilling your jack.
