


The DiMarzio Super Distortion Wiring Diagram You’ll Ever Need: A Comprehensive Guide
The DiMarzio Super Distortion pickup is a legendary name in the world of rock and metal guitar. Known for its high output, thick tone, and powerful sustain, it’s a favorite among guitarists seeking to unleash a sonic assault. But getting that iconic sound requires more than just the pickup itself; it demands precise wiring. This guide provides you with everything you need to understand and confidently wire your DiMarzio Super Distortion, ensuring you get the most out of this powerful pickup. We’ll cover various wiring configurations, making sure you find the perfect setup for your needs.
Understanding the DiMarzio Super Distortion
Before diving into the wiring diagrams, let’s establish some fundamentals. The DiMarzio Super Distortion is a humbucker pickup, meaning it utilizes two coils to cancel out hum and noise, resulting in a cleaner signal and a fuller sound. It typically features four conductor wires, allowing for a variety of wiring options beyond the standard humbucker configuration. These options provide flexibility in tone shaping, catering to different playing styles and guitar setups.
- Key Features:
- High output for powerful overdrive and distortion.
- Thick and focused low-end response.
- Aggressive mids for cutting through the mix.
- Four-conductor wiring for versatile tonal options.
Standard Humbucker Wiring for the DiMarzio Super Distortion
This is the most common and straightforward wiring configuration, producing the classic Super Distortion sound. It utilizes both coils of the pickup in series, maximizing output and providing a full, powerful tone.
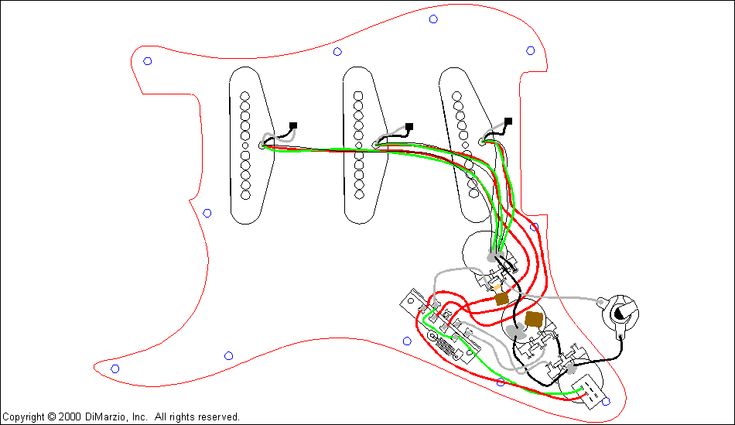
Diagram: (Insert a clear and easily readable diagram here. The diagram should show the following connections.)
DiMarzio Super Distortion Wires:
- Red (Hot)
- White
- Green
- Black
- Bare (Ground)
Connections:
- Hot (Output): Connect the Red wire to the selector switch or output jack’s hot terminal.
- Ground: Connect the Black and Bare wires to the guitar’s ground (usually the back of a potentiometer or the output jack ground).
- Connect White to Green: Solder the White and Green wires together and insulate them to prevent shorts.
Result: This wiring provides the full, unadulterated Super Distortion experience – a roaring, high-output humbucker perfect for rock and metal.
Coil Splitting the DiMarzio Super Distortion
Coil splitting allows you to access a single-coil tone by effectively disabling one of the humbucker’s coils. This provides a brighter, thinner sound, offering greater tonal versatility.
Diagram: (Insert a clear and easily readable diagram here. The diagram should show the following connections.)
DiMarzio Super Distortion Wires:
- Red (Hot)
- White
- Green
- Black
- Bare (Ground)
Connections:
- Hot (Output): Connect the Red wire to the selector switch or output jack’s hot terminal.
- Ground: Connect the Black and Bare wires to the guitar’s ground (usually the back of a potentiometer or the output jack ground).
- Coil Split: Connect the White wire to the switch that will be used for coil splitting (e.g., a push/pull potentiometer or a mini-toggle switch). When the switch is engaged, the white wire is connected to ground, effectively splitting the coil. The Green wire would remain connected to ground.
Result: This configuration allows you to switch between the full humbucker sound and a single-coil-like tone, expanding your sonic palette.
Series/Parallel Wiring for the DiMarzio Super Distortion
Series/Parallel wiring offers another way to modify the humbucker’s sound. In series, the coils are wired together, maximizing output. In parallel, the coils are wired side-by-side, resulting in a brighter, more open sound with a slight reduction in output.
Diagram: (Insert a clear and easily readable diagram here. The diagram should show the following connections.)
DiMarzio Super Distortion Wires:
- Red (Hot)
- White
- Green
- Black
- Bare (Ground)
Connections:
- Series (Humbucker Mode): Connect the Red wire to the output jack’s hot terminal. Connect the Green and Black wires to ground. Connect the White wire to the Green wire and insulate the joint.
- Parallel Mode: Connect the Red wire to the output jack’s hot terminal. Connect the Green and Black wires to ground. Connect the White wire to the output jack’s hot terminal.
Result: This provides a versatile setup allowing for the powerful humbucker sound and a brighter, more open tone.
Important Considerations Before Wiring
- Safety First: Always disconnect your guitar from the amplifier and any power source before working on the electronics.
- Soldering Skills: If you’re not comfortable with soldering, consider getting assistance from a qualified technician. Clean, solid solder joints are crucial for reliable performance.
- Wire Management: Keep your wiring neat and organized to avoid short circuits and ensure easy troubleshooting.
- Component Compatibility: Ensure that your potentiometers, switches, and other components are compatible with your guitar’s electronics.
- Refer to the DiMarzio Website: For the most up-to-date and official wiring diagrams, always consult the DiMarzio website.
Troubleshooting Common Wiring Issues
- No Sound: Double-check all your connections. Ensure the hot wire is connected to the correct output, and the ground wires are properly grounded.
- Thin or Weak Sound: Make sure the coils are wired in series (for the standard humbucker sound). Check for any broken solder joints or loose connections.
- Hum or Noise: Ensure all ground connections are solid. Shield the control cavity with copper tape to minimize interference. Check for any reversed polarity issues.
- Coil Splitting Not Working: Verify that the coil-splitting switch is functioning correctly and making a proper connection to ground.
Conclusion: Unleash the Beast
By understanding the DiMarzio Super Distortion’s wiring options, you can unlock its full potential and tailor its sound to your specific needs. Whether you’re seeking the raw power of a standard humbucker, the versatility of coil splitting, or the tonal variations of series/parallel wiring, this guide provides the knowledge and diagrams you need to confidently wire your pickup. Experiment with these configurations and find the perfect setup to unleash the beast within your guitar!
Frequently Asked Questions (FAQs)
1. What is the difference between series and parallel wiring for a humbucker?
In series wiring, the coils are connected end-to-end, increasing the output and producing a thicker, more powerful tone. In parallel wiring, the coils are connected side-by-side, resulting in a lower output, a brighter tone, and a more open sound.
2. What does “coil splitting” do, and why would I want it?
Coil splitting effectively disables one of the humbucker’s coils, allowing you to access a single-coil sound. This is useful for achieving brighter, thinner tones, which can be desirable for clean sounds, country, or blues playing.
3. Can I damage my DiMarzio Super Distortion by wiring it incorrectly?
While it’s unlikely that you’ll permanently damage the pickup with incorrect wiring, improper connections can lead to short circuits or no sound at all. Always double-check your connections before plugging in your guitar. If you are unsure, consult a professional.
4. What gauge wire should I use when wiring my DiMarzio Super Distortion?
The wire that comes with the pickup is usually sufficient. However, if you are replacing the wire, use 22-24 gauge wire for your wiring.
5. Where can I find the most up-to-date wiring diagrams for my DiMarzio Super Distortion?
The DiMarzio website is the best source for the most current and accurate wiring diagrams. They often provide diagrams for various configurations and specific guitar models.
