


2010 Nissan Sentra Fuse Box Diagram Simplified for Quick Fixes: Your Troubleshooting Guide
The 2010 Nissan Sentra, a reliable compact car, has a reputation for dependability. However, like any vehicle, it’s susceptible to electrical issues. Blown fuses are a common culprit, often causing frustrating problems like non-functioning headlights, a dead radio, or a stalled engine. This guide provides a simplified overview of the 2010 Nissan Sentra fuse box diagrams, empowering you to diagnose and fix these issues with confidence. You’ll find clear explanations and practical tips to get you back on the road quickly.
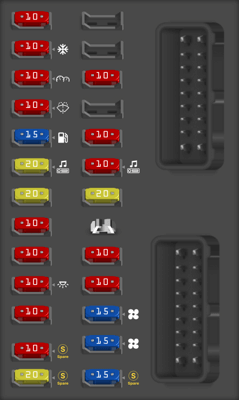
Understanding Your 2010 Nissan Sentra Fuse Boxes
Your 2010 Nissan Sentra has two primary fuse boxes:
- The Interior Fuse Box (Driver’s Side): Located under the dashboard on the driver’s side, typically behind a small access panel. This box handles circuits for interior lights, the radio, power windows, and other in-cabin electronics.
- The Engine Compartment Fuse Box (Under the Hood): This box is usually situated near the battery. It protects circuits that support the engine, headlights, horn, and other essential components.
Why are there two fuse boxes? This design allows for efficient distribution of power and helps protect various electrical systems throughout the vehicle.
Locating and Identifying Fuses: A Step-by-Step Guide
Before you start diagnosing, always disconnect the negative (black) terminal of your battery to prevent accidental short circuits.
- Locate the Fuse Boxes: As mentioned above, the main ones are under the dash (driver’s side) and in the engine compartment.
- Identify the Fuse Box Cover: Each fuse box will have a cover with a diagram. Keep this cover! It’s your primary guide.
- Consult the Diagram: The diagram on the cover shows the location and function of each fuse and relay. It will use symbols and abbreviations to identify the circuits.
- Inspect the Fuses:
- Visual Inspection: Look for a broken wire inside the fuse. A blown fuse will have a gap or a broken filament.
- Use a Fuse Tester: A fuse tester (available at most auto parts stores) provides a quick and accurate way to check the continuity of a fuse.
- Replacing a Fuse:
- Use the Correct Amperage: Always replace a blown fuse with one of the same amperage rating. This is crucial for protecting the circuit. The amperage rating is printed on the fuse itself.
- Use the Fuse Puller: The fuse boxes usually include a small fuse puller tool. Use this to safely remove and insert fuses.
- Don’t Over-Fuse: Never use a fuse with a higher amperage rating than specified. This can lead to overheating and damage to the wiring or the component it protects.
Common Fuse Issues and Troubleshooting Tips
Here are some common electrical problems in a 2010 Nissan Sentra and the fuses you might need to check:
- Headlights Not Working: Check the fuse labeled “Headlight” or “Headlamp” in the engine compartment fuse box. Also, inspect the headlight bulbs themselves.
- Radio Not Working: Locate the fuse labeled “Radio,” “Audio,” or “ACC” (accessory) in the interior fuse box.
- Power Windows Not Working: Check the fuse labeled “Power Windows” or “PWR Windows” in the interior fuse box.
- Cigarette Lighter/Power Outlet Not Working: Check the fuse labeled “Cigarette” or “CIG” in the interior fuse box.
- Engine Cranking But Not Starting: This can be a more complex issue, but check the fuses related to the fuel pump and ignition system in the engine compartment fuse box.
Important Considerations:
- Relays: The fuse boxes also contain relays, which are like electronic switches. While fuses protect circuits, relays control them. If a component isn’t working, and the fuse is good, the relay might be faulty. The diagram on the fuse box cover will show the location of the relays.
- Wiring Diagrams: For more complex issues, consult a wiring diagram specific to your 2010 Nissan Sentra. These diagrams can be found in repair manuals or online.
- Professional Help: If you’re uncomfortable working with electrical systems or cannot identify the problem, consult a qualified mechanic.
Conclusion: Empowering Your Sentra’s Electrical Health
By understanding the 2010 Nissan Sentra fuse box diagrams and following these simplified troubleshooting steps, you can efficiently diagnose and resolve common electrical issues. Regularly checking your fuses and keeping the fuse box diagrams handy will contribute to your vehicle’s reliability and prevent unexpected breakdowns. Remember to prioritize safety, always disconnect the battery before working on electrical components, and seek professional help when necessary.
Frequently Asked Questions (FAQs)
- Where can I find the fuse box diagrams for my 2010 Nissan Sentra? The primary diagram is on the cover of each fuse box. You can also find diagrams in your owner’s manual or online by searching for “2010 Nissan Sentra fuse box diagram.”
- What do I do if the fuse keeps blowing? This indicates a short circuit or an overload in the circuit. Do not replace the fuse with a higher amperage fuse. You need to identify the root cause. This might require professional diagnosis to trace the wiring and find the problem.
- Can I use a fuse with a higher amperage rating? No. Using a fuse with a higher amperage rating can damage the wiring and the component the fuse protects, potentially leading to a fire. Always use the correct amperage specified on the fuse box diagram.
- What if I’m unsure which fuse controls a specific component? Consult the fuse box diagram on the cover. If the component still isn’t working after replacing the corresponding fuse, there might be a problem with the component itself or its wiring.
- How do I know if a relay is bad? You can test a relay using a multimeter. However, relay testing can be complex. If you suspect a relay issue, consult a qualified mechanic.
