


2000 Harley Davidson Road King Wiring Made Simple for DIY Riders
The 2000 Harley Davidson Road King. A classic, powerful machine, synonymous with freedom and the open road. But even the most seasoned riders can find themselves facing a wiring dilemma. Whether you’re troubleshooting a flickering headlight, upgrading your electrical system, or simply trying to understand the inner workings of your bike, understanding the wiring on your 2000 Road King is crucial. This guide is designed to demystify the electrical system, making it accessible for DIY riders of all skill levels. We’ll break down the key components, common issues, and best practices for tackling your Road King’s wiring with confidence.
Understanding Your 2000 Road King Wiring: The Basics
Before diving into specific components and procedures, it’s essential to grasp the fundamental principles of your Road King’s electrical system. Think of it like a network of interconnected pathways, where electricity flows to power various components.
- The Battery: The Powerhouse: Your 12-volt battery is the heart of the system, providing the initial power.
- The Charging System: Keeping the Power Flowing: The alternator (or generator) recharges the battery while the engine is running.
- Wiring Harnesses: The Electrical Highways: Bundles of wires, color-coded for easy identification, distribute power to different parts of the bike.
- Fuses and Circuit Breakers: Protection from Overload: These safety devices prevent damage to the electrical system by interrupting the flow of electricity in case of a short circuit or overload.
- Grounding: The Return Path: Ground wires provide a path for electricity to return to the battery, completing the circuit.
Key Components and Their Wiring: A Closer Look
Let’s break down some of the most critical components and their associated wiring on your 2000 Road King:
- Headlight and Taillight:
- Wiring: Typically, these lights have three wires: a power wire (usually red or orange), a ground wire (usually black), and a wire for the high/low beam (in the case of the headlight).
- Common Issues: Blown bulbs, loose connections, and corrosion are frequent problems.
- Turn Signals:
- Wiring: Each turn signal will have a power wire (often orange or blue), a ground wire (black), and sometimes a wire for the running light function.
- Common Issues: Blinking too fast, failure to blink, or short circuits.
- Ignition System:
- Wiring: Includes the ignition switch, coil, and spark plugs. The ignition switch controls power to the ignition system, and the coil steps up the voltage to create a spark at the spark plugs.
- Common Issues: No spark, weak spark, or intermittent starting.
- Starter Motor:
- Wiring: A heavy-gauge wire connects the starter motor to the battery. The starter solenoid receives a signal from the start button to engage the starter motor.
- Common Issues: Starter not engaging, clicking sound, or slow cranking.
Essential Tools and Safety Precautions
Before you start working on your Road King’s wiring, ensure you have the right tools and take the necessary safety precautions:
- Essential Tools:
- Multimeter: For testing voltage, continuity, and resistance.
- Wire Strippers and Crimpers: For preparing and connecting wires.
- Screwdrivers (Phillips and Flathead): For removing panels and accessing components.
- Wrenches and Sockets: For removing and replacing components.
- Electrical Tape and Heat Shrink Tubing: For insulating and protecting connections.
- Wiring Diagram: A crucial resource for understanding the wiring layout. (See resources section below)
- Safety Precautions:
- Disconnect the Battery: Always disconnect the negative (-) terminal of the battery before working on the electrical system.
- Work in a Well-Lit Area: Good lighting is essential for identifying wires and connections.
- Wear Safety Glasses: Protect your eyes from flying debris.
- Avoid Working Near Open Flames: Gasoline and other flammable liquids can be dangerous.
- Double-Check Your Work: Before reconnecting the battery, carefully inspect all connections to ensure they are secure and properly insulated.
Troubleshooting Common Wiring Problems
Here’s a quick guide to troubleshooting some common wiring problems:
- No Power:
- Check the battery voltage.
- Inspect the main fuse and all other fuses.
- Check for loose or corroded connections.
- Test the ignition switch.
- Lights Not Working:
- Check the bulbs.
- Inspect the wiring for breaks or shorts.
- Test the light switch.
- Check the ground connections.
- Turn Signals Not Working:
- Check the flasher relay.
- Inspect the turn signal switch.
- Check the bulbs.
- Inspect the wiring for breaks or shorts.
- Starting Problems:
- Check the battery voltage.
- Test the starter motor.
- Inspect the starter solenoid.
- Check the ignition system.
Resources and Further Learning
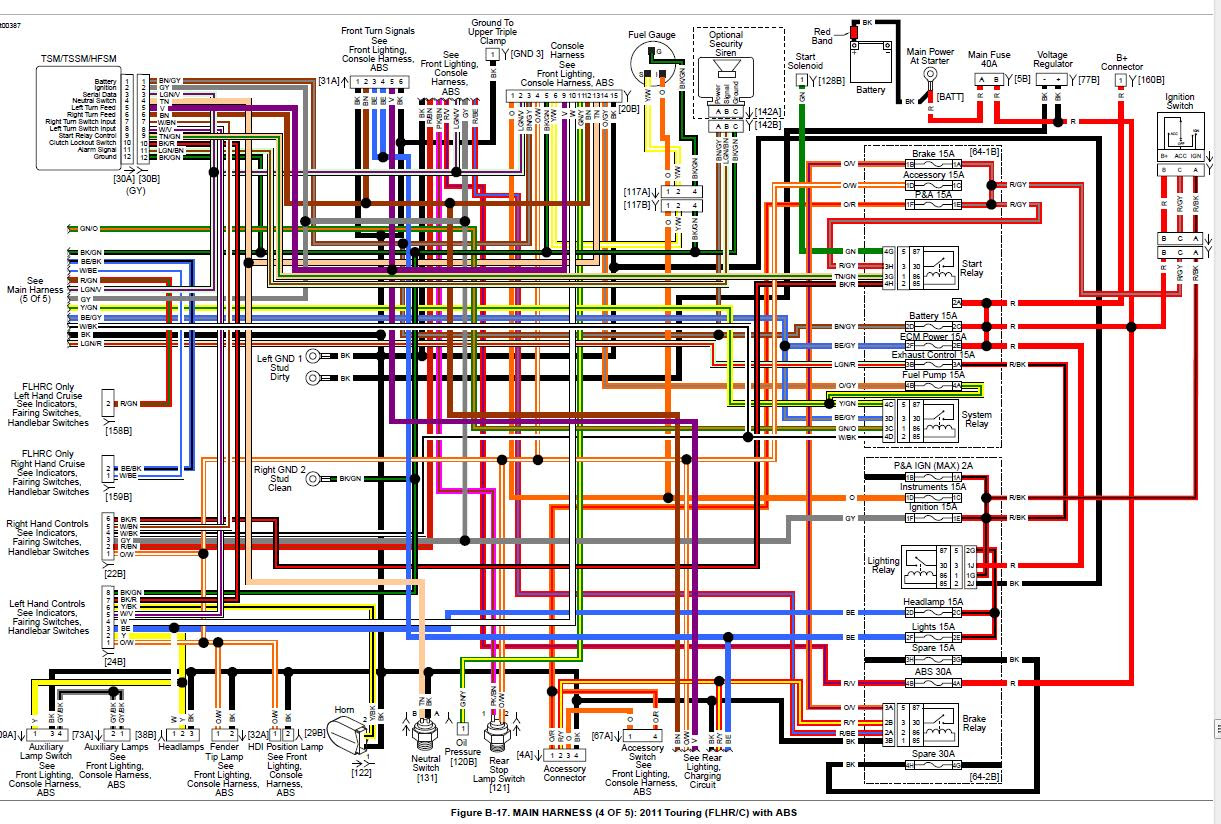
- Wiring Diagrams: Obtain a specific wiring diagram for your 2000 Road King. These are available online through Harley-Davidson service manuals, Haynes manuals, and other online resources. Search using terms like “2000 Road King wiring diagram PDF”
- Online Forums and Communities: Harley Davidson Forums and other online resources are great places to ask questions and get advice from experienced riders.
- Service Manuals: A factory service manual is invaluable for detailed information on your bike’s electrical system.
Conclusion: Empowering Your DIY Road King Experience
Understanding the wiring on your 2000 Harley Davidson Road King might seem daunting, but with the right knowledge, tools, and a bit of patience, it’s a manageable task. By breaking down the system into manageable components, utilizing wiring diagrams, and following safety precautions, you can confidently troubleshoot and maintain your bike’s electrical system. This knowledge will not only save you money on repairs but also deepen your appreciation for your classic Road King and the freedom it represents. Happy riding!
FAQs: Frequently Asked Questions
1. Where can I find a reliable wiring diagram for my 2000 Road King?
You can find wiring diagrams in official Harley-Davidson service manuals, Haynes manuals, and through online resources like the Harley-Davidson forums and other DIY motorcycle websites. Always ensure the diagram is specifically for the 2000 model year.
2. What is the most common cause of electrical problems on a Harley Davidson?
Corrosion and loose connections are among the most frequent causes of electrical issues on Harley-Davidsons. Vibration over time can loosen connections, and exposure to the elements can lead to corrosion, disrupting the flow of electricity.
3. How do I identify a wire’s function if the color is faded or missing?
Refer to your wiring diagram. The diagram will specify the wire’s function based on its location and the components it connects to. If the color is completely gone, you may need to test the wire’s continuity with a multimeter to determine its function.
4. What gauge wire should I use for repairs or upgrades?
Always use the same gauge wire as the original. If you are unsure, consult your wiring diagram or a Harley-Davidson service manual. Using a wire that is too thin can cause overheating and potential fire hazards.
5. What is the best way to protect wiring connections from corrosion?
Use dielectric grease on all connections, especially those exposed to the elements. Regularly inspect your wiring for signs of corrosion and replace any damaged wires or connectors.
