


1999 Chevy Malibu Fuse Diagram: Your Complete Guide for Quick Fixes
The 1999 Chevy Malibu, a reliable workhorse of its era, relies on a complex electrical system to power everything from your headlights to your radio. When something goes wrong, a blown fuse is often the culprit. Knowing where to find and how to interpret the fuse diagram is crucial for quick and efficient troubleshooting. This comprehensive guide provides everything you need to identify and replace fuses in your 1999 Chevy Malibu, getting you back on the road in no time.
Understanding the Importance of Fuses
Fuses act as safety devices within your car’s electrical circuits. They are designed to protect your vehicle’s components from damage caused by power surges or short circuits. When a circuit experiences an overload, the fuse melts, breaking the circuit and preventing potential fires or damage to sensitive electronics. Therefore, regularly checking and replacing blown fuses is vital for maintaining your Malibu’s functionality and safety.
Locating the Fuse Boxes in Your 1999 Chevy Malibu
The 1999 Chevy Malibu typically has two fuse boxes:
- Under the Hood (Engine Compartment): This fuse box houses the fuses that protect the engine, cooling system, and other essential components.
- Inside the Vehicle (Dashboard/Passenger Compartment): This fuse box protects the interior electrical systems, such as the radio, lights, and power windows.
Finding the Fuse Boxes:
- Under the Hood: Look for a rectangular black box, often labeled “Fuse Box” or “Power Distribution Center.” It’s usually located near the battery.
- Inside the Vehicle: The location of the interior fuse box can vary slightly. It’s commonly found:
- On the driver’s side dashboard, near the steering wheel.
- Behind a panel on the passenger’s side dashboard.
Refer to your owner’s manual for the exact location of the fuse boxes in your specific Malibu model.
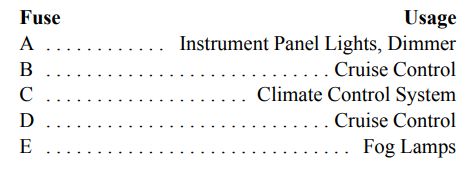
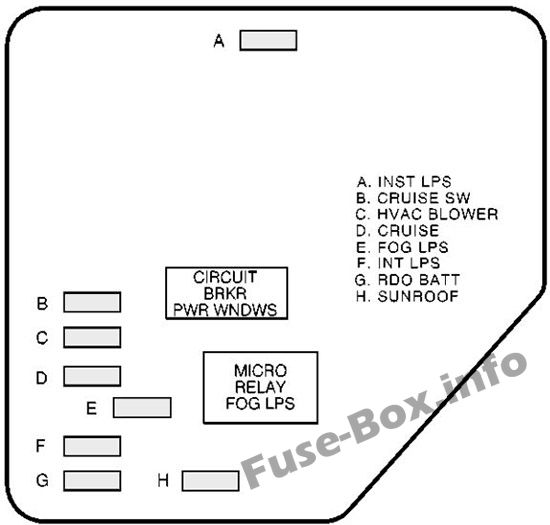
Decoding the Fuse Diagram: A Step-by-Step Guide
The fuse diagram is your key to identifying the correct fuse for a malfunctioning component. It’s usually located on the inside of the fuse box cover or in your owner’s manual. Here’s how to interpret it:
- Identify the Fuse Box: Make sure you’re looking at the correct diagram for the fuse box you’re working with (under the hood or inside the vehicle).
- Locate the Component: The diagram will list each fuse and the component it protects (e.g., “Radio,” “Headlights,” “Brake Lights”).
- Identify the Fuse Amperage: The diagram will indicate the amperage (e.g., 10A, 15A, 20A) of each fuse. This is critical. Never replace a fuse with one of a higher amperage. Doing so can damage the protected component and potentially cause a fire.
- Fuse Type: The diagram might also specify the type of fuse (e.g., blade fuse). Ensure you have the correct replacement fuse.
- Fuse Numbering: The diagram will often have a corresponding number for each fuse, which helps you locate the correct fuse in the physical fuse box.
How to Replace a Blown Fuse: A Practical Guide
- Safety First: Turn off the ignition and disconnect the negative (black) battery cable. This minimizes the risk of electrical shock or short circuits.
- Locate the Blown Fuse: Use the fuse diagram to identify the fuse that corresponds to the malfunctioning component. Examine the fuse visually. A blown fuse will have a broken wire or a darkened interior.
- Remove the Blown Fuse: Use a fuse puller (often included in the fuse box cover) to carefully remove the blown fuse. If you don’t have a fuse puller, you can carefully use needle-nose pliers or your fingers (but be careful not to damage the fuse box).
- Inspect the Fuse: Check to see if the fuse is blown.
- Install the New Fuse: Insert the new fuse of the correct amperage and type into the empty slot. Ensure it’s securely seated.
- Reconnect the Battery: Reconnect the negative battery cable.
- Test the Component: Turn on the ignition and test the component that was previously malfunctioning. If it works, you’ve solved the problem! If it doesn’t, double-check the fuse and the wiring for any other potential issues.
Common Fuse Issues and Their Locations
Here are some common problems and the likely fuses involved in a 1999 Chevy Malibu:
- Headlights: Typically a fuse located in the engine compartment fuse box.
- Brake Lights: Often found in the interior fuse box.
- Radio: Usually located in the interior fuse box.
- Power Windows: Commonly found in the interior fuse box.
- Cigarette Lighter/Power Outlet: Typically in the interior fuse box.
Important Note: The specific fuse locations may vary slightly depending on the trim level and options of your Malibu. Always consult your owner’s manual for precise information.
Troubleshooting Tips
- Check for Short Circuits: If a fuse blows repeatedly, there’s likely a short circuit in the wiring. Inspect the wiring for any damage, exposed wires, or loose connections.
- Consider Professional Help: If you’re not comfortable working with electrical systems, or if you can’t identify the problem, it’s best to consult a qualified mechanic.
- Keep Spare Fuses Handy: It’s always a good idea to keep a selection of spare fuses in your glove compartment.
Conclusion
Understanding your 1999 Chevy Malibu’s fuse system is essential for maintaining its functionality and safety. By following this guide, you can confidently locate the fuse boxes, interpret the fuse diagram, and replace blown fuses, saving yourself time and money. Remember to consult your owner’s manual for the most accurate information specific to your vehicle. With this knowledge, you can keep your Malibu running smoothly for years to come.
Frequently Asked Questions (FAQs)
1. Where can I find the fuse diagram for my 1999 Chevy Malibu?
The fuse diagram is usually located on the inside of the fuse box cover or in your owner’s manual.
2. What should I do if a fuse keeps blowing?
If a fuse keeps blowing, there’s likely a short circuit in the wiring. Inspect the wiring for any damage, exposed wires, or loose connections. Consider consulting a mechanic.
3. Can I use a fuse with a higher amperage than the one specified in the diagram?
No, never use a fuse with a higher amperage. This can damage the protected component and potentially cause a fire.
4. What type of fuses does my 1999 Chevy Malibu use?
Your Malibu typically uses blade-type fuses. The specific type may vary, so always check the fuse diagram or the old fuse for confirmation.
5. What tools do I need to replace a fuse?
You’ll typically need a fuse puller (often included in the fuse box cover) and a replacement fuse of the correct amperage and type. Needle-nose pliers can also be used with care.
