

1997 BMW 318i Wiring Diagram: A Complete Guide for Owners
Owning a 1997 BMW 318i is a rewarding experience, offering a blend of driving performance, classic styling, and German engineering. However, as with any vehicle, electrical issues can arise. When faced with these challenges, a comprehensive understanding of your car’s wiring system becomes essential. This guide provides a detailed overview of the 1997 BMW 318i wiring diagram, empowering owners to troubleshoot and maintain their vehicle’s electrical components with confidence.
Understanding the Importance of Wiring Diagrams
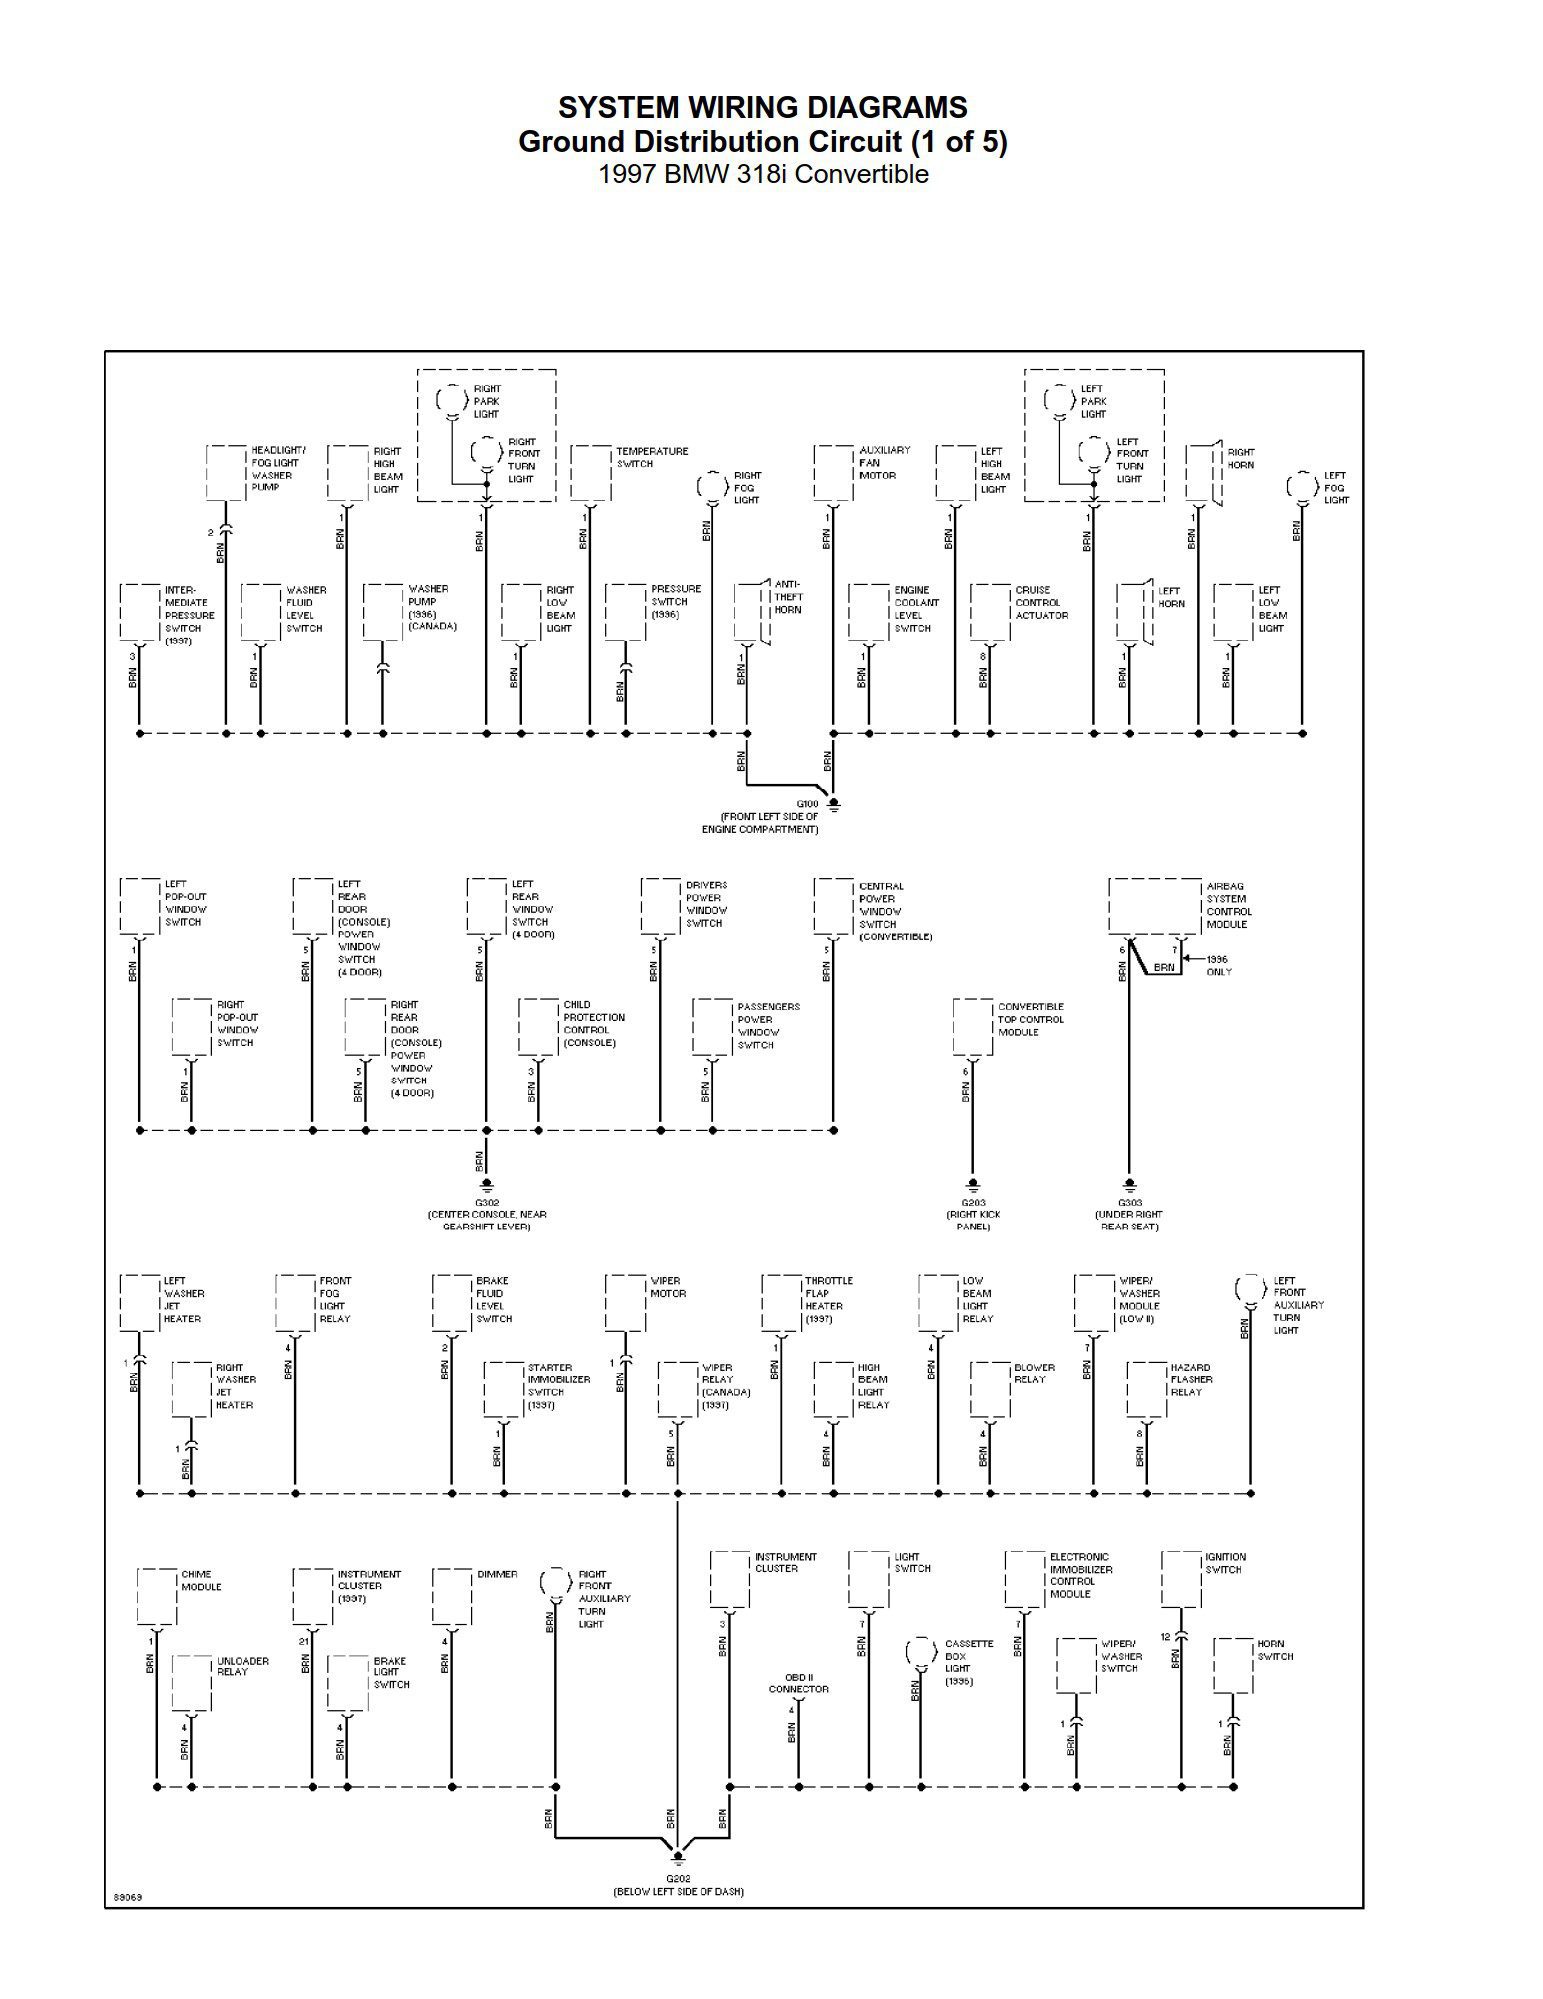
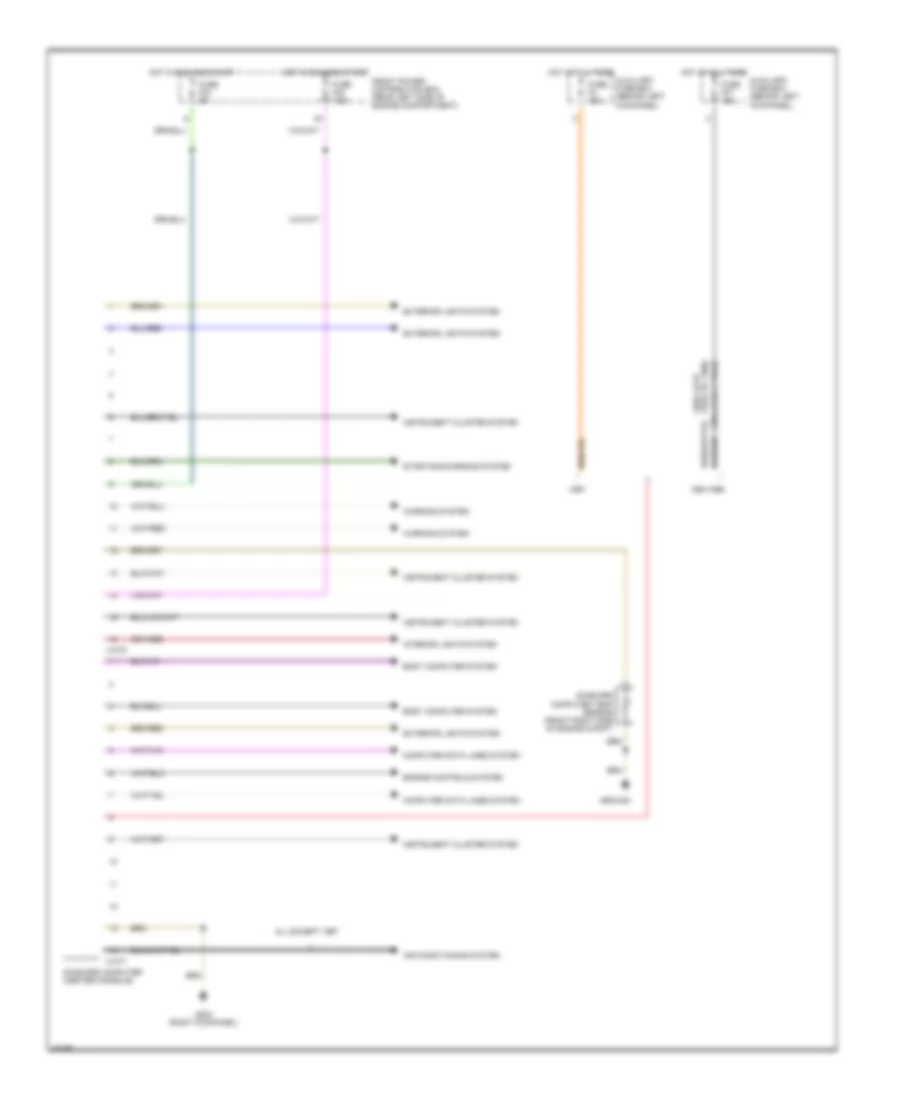
Wiring diagrams are essentially roadmaps for your car’s electrical system. They illustrate how different components, such as lights, sensors, the engine control unit (ECU), and the audio system, are interconnected through wires, fuses, and relays. Without a proper wiring diagram, diagnosing electrical faults can be a frustrating and time-consuming process. The 1997 BMW 318i, while known for its quality, is no exception to the possibility of electrical problems. Understanding how to interpret these diagrams is crucial for:
- Troubleshooting Electrical Faults: Quickly identify the source of a problem, such as a non-functioning headlight or a malfunctioning sensor.
- Performing Repairs & Modifications: Safely and accurately connect and disconnect electrical components.
- Preventing Damage: Avoid short circuits and other issues that can arise from incorrect wiring.
- Understanding Component Function: Gain a deeper understanding of how your car’s electrical systems work.
- Saving Money: Reduce reliance on expensive mechanic services.
Where to Find Your 1997 BMW 318i Wiring Diagram
Accessing the correct wiring diagrams for your 1997 BMW 318i is the first step. Here are the most reliable resources:
- Bentley Publishers Repair Manual: This is the gold standard. Bentley manuals are specifically designed for BMWs and contain detailed wiring diagrams, component locations, and repair procedures. They are available in both print and digital formats.
- Online Forums and Communities: BMW enthusiast forums and online communities often share wiring diagrams and related information. However, always verify the accuracy of the information you find.
- Specialized Automotive Data Websites: Some websites provide access to wiring diagrams for various vehicle makes and models, often requiring a subscription.
- Dealerships: While a dealership may offer access to the diagrams, they are often for their internal service use and may come at a cost.
Important Note: When using any wiring diagram, ensure it is specifically for your 1997 BMW 318i, and double-check for variations based on specific trim levels or optional equipment.
Decoding the Wiring Diagram: Key Elements
Wiring diagrams can appear complex at first glance, but understanding a few key elements will make them easier to navigate:
- Wire Colors: Wires are color-coded to identify their function and the circuits they belong to. Common colors include:
- Brown: Ground
- Red: Power (usually positive)
- Blue: Often used for lighting circuits
- Yellow: Sometimes used for safety systems
- Symbols: Diagrams use standardized symbols to represent components like:
- Resistors
- Capacitors
- Diodes
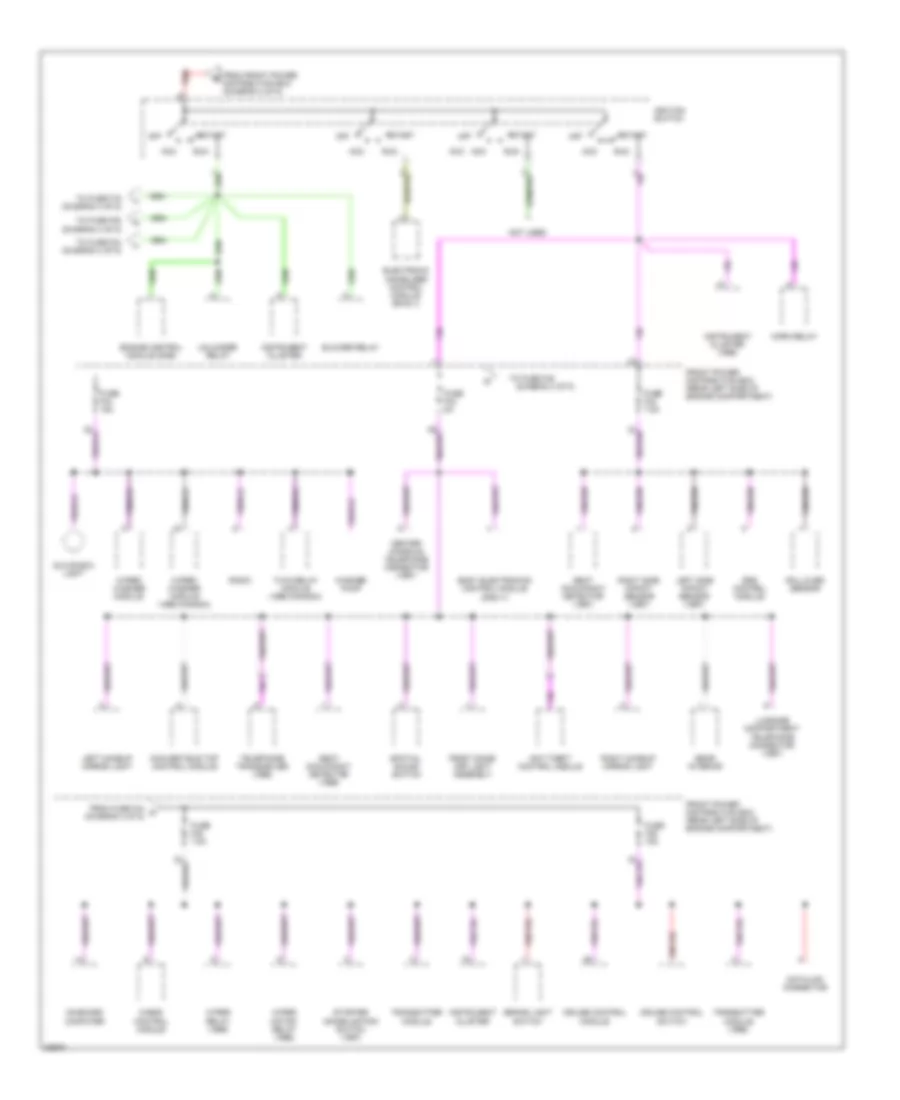
- Fuses
- Relays
- Connectors
- Circuit Numbers: Circuits are typically numbered to help identify their function and facilitate tracing the wiring path.
- Component Locations: The diagrams may include locations, or you can use the Bentley manual to locate components.
Common Electrical Issues in the 1997 BMW 318i
While the 1997 BMW 318i is generally reliable, certain electrical issues can be more common:
- Faulty Sensors: Sensors, such as the crankshaft position sensor or oxygen sensors, can fail, triggering warning lights or impacting engine performance.
- Wiring Harness Degradation: Over time, wiring harnesses can become brittle and crack due to heat and vibration, leading to shorts or open circuits.
- Fuse Box Problems: Corrosion or loose connections within the fuse box can interrupt power to various circuits.
- Lighting Issues: Headlights, taillights, and interior lights can experience problems due to bulb failures, wiring issues, or switch malfunctions.
- Power Window Malfunctions: Window motors and related wiring can fail, causing power windows to stop working.
Using the Wiring Diagram for Troubleshooting
Here’s a step-by-step approach to using the wiring diagram for troubleshooting:
- Identify the Problem: Clearly define the issue you are experiencing. For example, “The headlights on the left side are not working.”
- Consult the Diagram: Locate the wiring diagram for the affected circuit (in this case, the headlight circuit).
- Trace the Wires: Follow the wires from the power source (battery or fuse) to the faulty component (the headlight bulb).
- Check for Power and Ground: Use a multimeter to check for power and ground at various points along the circuit.
- Inspect Connections: Examine connectors, terminals, and wiring for corrosion, damage, or loose connections.
- Test Components: If necessary, test components like relays, switches, and the headlight bulb itself.
- Make Repairs: Once you’ve identified the fault, repair the wiring, replace the damaged component, or address any other identified issues.
Safety Precautions
Working with automotive electrical systems requires caution:
- Disconnect the Battery: Always disconnect the negative terminal of the battery before working on any electrical components.
- Use the Correct Tools: Use insulated tools to prevent short circuits.
- Work in a Well-Lit Area: Ensure adequate lighting to see the wiring and components clearly.
- Avoid Moisture: Keep electrical components dry.
- Understand Polarity: Be aware of positive and negative polarity to avoid damage.
- Consult a Professional: If you are unsure about any aspect of the repair, seek professional assistance from a qualified mechanic.
Conclusion
A comprehensive understanding of the 1997 BMW 318i wiring diagram is a valuable asset for any owner. By using the information in this guide, you can confidently troubleshoot electrical problems, perform repairs, and maintain your classic BMW. Remember to prioritize safety, use the correct resources, and take your time. Happy wrenching!
Frequently Asked Questions (FAQs)
Q: Where can I find the fuse box diagram for my 1997 BMW 318i?
A: The fuse box diagram is usually located inside the fuse box cover or in the owner’s manual. If you do not have one, the Bentley manual will also have the diagram.
Q: What does it mean if my 1997 BMW 318i is blowing fuses repeatedly?
A: A repeatedly blown fuse indicates a short circuit or an overload in the protected circuit. Consult the wiring diagram to identify the circuit and trace the wiring to find the source of the problem.
Q: Can I use a generic wiring diagram for a different year or model BMW?
A: No, it is essential to use a wiring diagram specifically for your 1997 BMW 318i, as wiring configurations can vary significantly.
Q: What tools do I need to troubleshoot electrical problems?
A: At a minimum, you will need a multimeter, wire strippers/crimpers, and a set of insulated tools. A test light can also be helpful.
Q: Is it difficult to replace a wiring harness?
A: Replacing a wiring harness can be a complex and time-consuming process, depending on the location and the extent of the damage. It often involves disassembling parts of the car. Consider seeking professional help if you are not comfortable with this type of repair.
